
Beginner Basics: Creating A Bonsai For The First Time
This step-by-step pictorial is designed to guide beginners through the mechanical process of cutting, shaping and transplanting fairly simple bonsai material for the first time. It makes the assumption that the reader has already done some research and has a basic understanding of the fundamental shaping concepts used in the art of bonsai such as:
1. Triangulation and asymmetrical composition.
2. Primary, secondary and tertiary branch identification and placement.
3. Selection of primary viewing angle based on trunk movement and rootage .
If you do not understand the three concepts outlined above, you would be well advised to invest in a little more research time before beginning this exercise. This is because the single most difficult thing for beginners to master is the ability to “see” the bonsai hiding inside the mass of greenery from which they most often work. A firm grasp of the fundamentals is of paramount to enhancing your ability to identify usable and non-usable elements of the plant material. Once you have that, the ability to “see” becomes gradually clearer with more and more practice. For this exercise, we have selected a Dwarf Japanese Garden Juniper (Juniperus procumbens nana). We have done so because, junipers are particularly good specimens for beginners to practice on and because they are extremely vigorous growers with flexible branches and trunks. They like full sun, but will grow happily in a wide variety of locations and conditions. They also have the added advantage of being a bit “forgiving” when newcomers make mistakes. Since you are learning, we assume you will be making a few mistakes along the way. Its good to have plant material which is willing to work with you. Junipers (particularly procumbens nana) are usually willing to do so. The juniper selected is a one gallon tree, about 5 years old. Commercial nurserymen would normally sell this tree as a low growing ground spreader. However, we chose this one from a group of about 75 at a local nursery, because the main trunk had been tied to a bamboo pole, causing it to grow vertically. This “pre-training” made it a good candidate for bonsai cultivation.
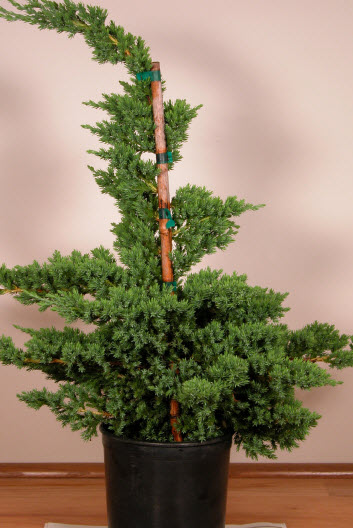
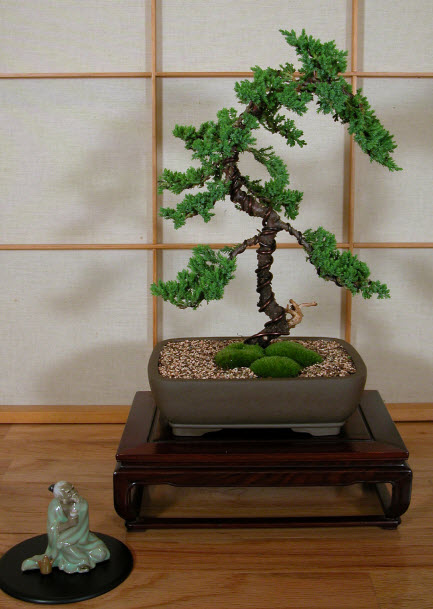
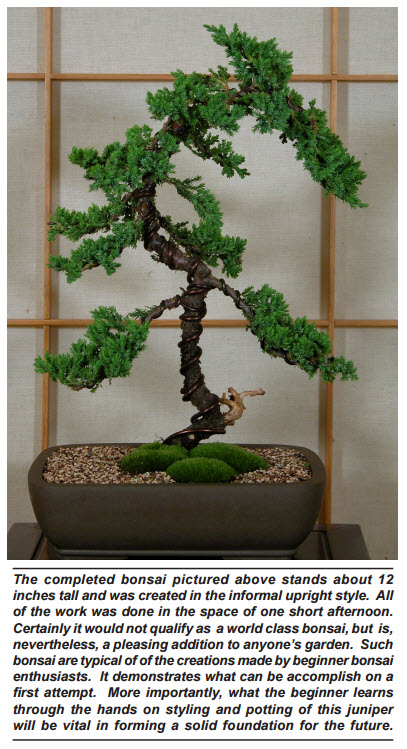
The photo at left shows the uncut nursery stock exactly as it was purchased from the vendor. The photo on right was taken approximately two hours later and shows the finished bonsai which was made from this material. Not all bonsai are as “instant” as this example. In fact, truly quality bonsai may take years to develop.
Step One: Clean Up
It will be impossible to make any effective decisions about the styling of the tree until is possible to ascertain what the existing trunk shape and branch placement is. The first task is, therefore, to clean up the tree. Start by removing the bamboo stake and then begin cleaning out all dead needles and other debris from the interior of the tree. One of the things which make junipers good material for bonsai is they readily develop new growth on old wood. This is a good characteristic for any bonsai subject to have. However, initially a great deal of this rampant budding along the trunk must be removed in order to see the trees shape. Start at the bottom of the tree and begin removing green buds and suckers which obstruct your view of the trunk. At the same time remove green growth from the interior of each branch an inch or so thus allowing you to see the position of each branch as it relates to the trunk. Once you have completed this task you will be able to clearly see the shape of the trunk and where each of the branches emerge around it. Next, dig gently at the base of the trunk and remove soil until you find the point at which the roots begin to flare outward. This will be the base of your new bonsai.
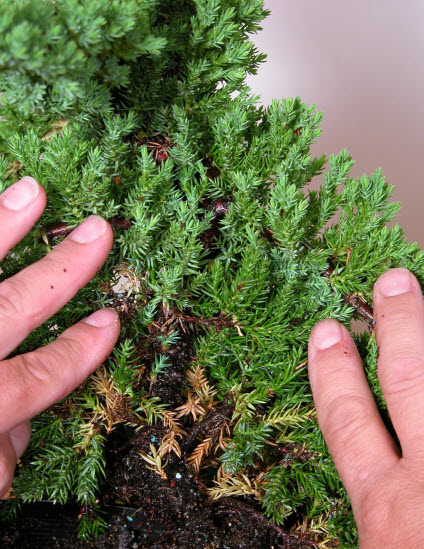
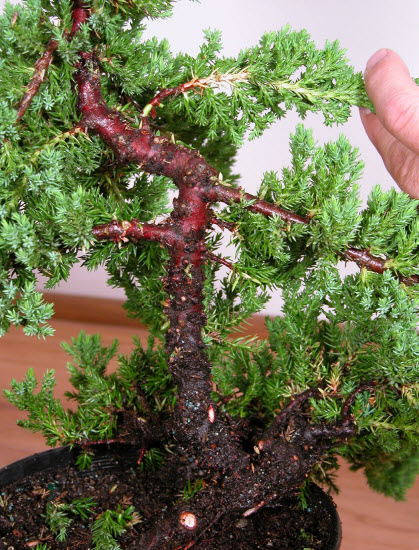
The material must first be cleaned up so that you can see the trunk shape and position of branches along the trunk. Remove dead plant material and sucker growth along the trunk and about an inch out the base of each branch.
Step Two: Wiring & Shaping
Once you can clearly see the trunk line and branches you may begin to make artistic decisions regarding the final appearance of your bonsai. As mentioned earlier, these decisions should be based on your clear understanding of the fundamentals of bonsai design and will be applied to each type of plant material on which you work in the future.
Find a front for the tree based on the trunk movement and nebari. Select its first, second and back branches. Determine an apex and the placement of all secondary branching. Remove all others. In a word… Cut off anything that does not look like a bonsai.
 Start by inserting a main line trunk wire about 2 inches into the root mass to secure it.

Complete the wiring process for every branch on the tree.Smaller branches will need smaller wire to secure them for bending.
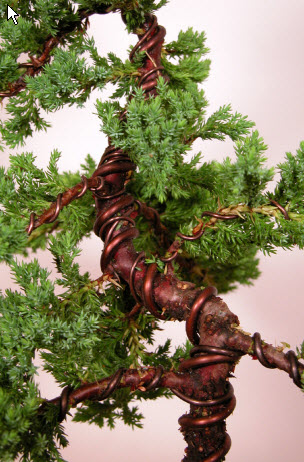
Coil the wire around the trunk
We know this is easy to say and not so easy to do, but proceed slowly and carefully. Remember that it is better to leave a branch on the tree, wire it and try to work it into the final composition than to remove it first and later discover that is was needed. Let the Japanese concept of “less is more,” guide you in this. You are trying to make the most dramatic statement possible by using the fewest amount of words… or in this case, branches.
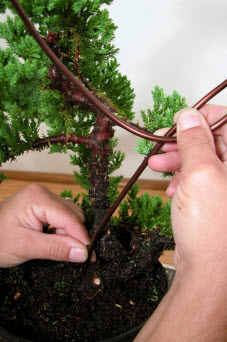
In the case of this juniper we have decided to move the top of the trunk to a different location. We will adjust this and the branch positions by using wire. A main line trunk wire of sufficient thickness to hold the bend in the apex is inserted into the soil about an inch or so to anchor it. It is then wrapped up the trunk, snug against same and at about a forty-five degree angle perpendicular to the line of the trunk.
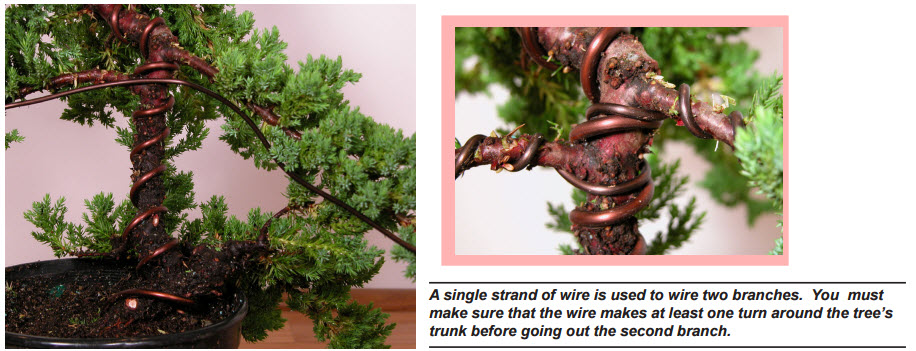
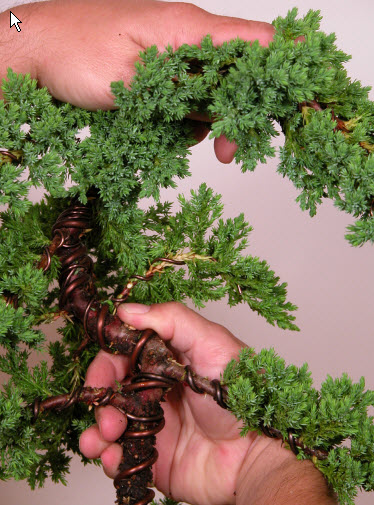
Once this is completed, branches may be wired. Always use one piece of wire to wrap and bend two branches. Since the branches are thinner, the wire used may be smaller, but still of sufficient thickness to hold the branch in place once it is bent.
Hold the branch securely between your thumb and forefinger and wrap the wire around the branch. Then, with the second half of the wire make at least one turn around the trunk (more of necessary) following the path of the main line trunk wire until you can go out the second branch . Repeat this process until all branches remaining in your design have been wrapped in wire. Proceed from heavier branches and heavier wire to smaller branches and smaller wire. When going up the trunk, follow the line of the existing wire and try to avoid crossing wires whenever possible.
When all branches are wired it becomes possible to move them and the apex into the positions which you feel are best for your final design. Go slowly in this process. If you feel the branch cracking or splitting away from the trunk… stop. Junipers are fairly supple plants and branches usually move into desired positions with minimal difficulty. This is not so with all species of plants. Interestingly enough, you will be less likely to break and crack branches if the juniper’s root mass is allowed to go slightly dry before the wiring process.
Nevertheless, you are bound to crack a few branches and scuff a little bark during this first attempt. If the crack or break is serious, trying sealing it with one of the many tree sealers available for bonsai. If you don’t have any available, try using a little Elmer’s glue. It’s not toxic, drys clear and makes an airtight seal. If the branch does not remain in the position you wish it may be necessary to apply a second wrap around that particular branch with another wire… or simply remove the first wire and replace it with one of sufficient thickness to do the job.

Once wired, the tree’s apex and all branches may be bent and moved to the required positions. Below: The tree, with all branches in desired position needs only to have the length of each branch adjusted to achieve a triangular shape and proper asymmetrical balance.
Step Three: Detail Pruning & Shaping
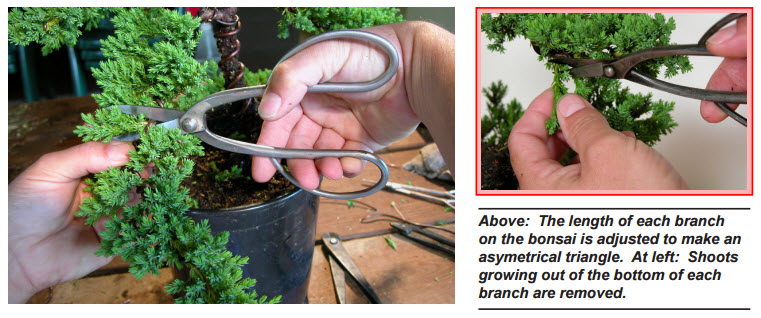
Once you have move all the branches into the approximate positions for your final design, trim back the length of branches to establish the overall shape of the tree. Remember that all bonsai have a triangular shape. In most cases, the largest and longest branches are located at the bottom. Branches gradually get thinner and shorter as they approach the apex.
Once you have shortened the branches to the desired length and established a well balanced composition, begin to work on each individual branch. Remove all green growth which emerges from the bottom of these branches. (Trees do not grow leaves out of the bottom of a branch) and cut or pinch back foliage on the tops and sides of each branch until they begin to develop a pad like shape. In the future, as the tree grows and develops you will need to keep these foliage pads pinched back and well formed. They will become more dense with green growth and add greatly to it’s appearance of age and maturity.
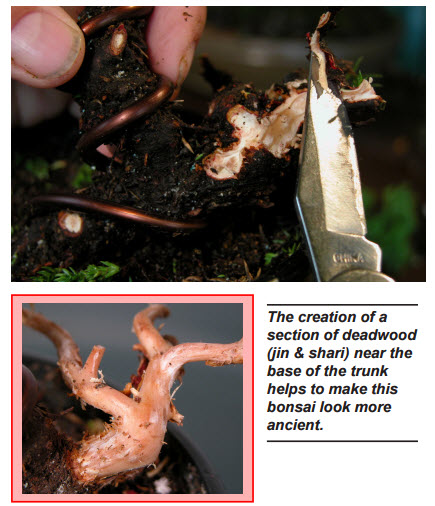
In the case of this particular juniper we have decided to create an area of deadwood using a live branch near the base of the tree. Many bonsai, particularly those with needles such as juniper and pine, often have deadwood incorporated into their design by the artist. These deadwood areas (jin and shari) add to the trees look of old age because they resemble forest ancients which have been broken back by the weight of time and weather. It is not mandatory to have deadwood on a bonsai, but it is often done.
The process is simple. All the foliage is removed from the branch and then the bark and underlying cambium layer are removed exposing the tree’s heart wood. A sharp knife works best for this process. It will, of course, kill the branch. Take care not to remove or damage bark and cambium which feeds the rest of the trunk. Once this is done you should carve pruner cuts and shape the deadwood so that it looks very natural and interesting . In a month or two, when the area has dried out, you may apply a coating of lime sulfur which will help to preserve the deadwood and also give it a whitened, ancient, weather beaten appearance. This being done, the basic shaping of our bonsai is complete and it is ready to be transplanted into a container.
Step Four: Preparation For Potting
The process of transplanting a bonsai from its growing container into a finished bonsai container can be compared to selecting the right frame for a painting. A wise and compatible choice can make a dramatic difference in how the whole composition is perceived.
Beginners should be aware that no matter what the size, shape or color of the container they select, it must meet one very important requirement. Containers must always provide sufficient space for the growth and health of the root system. This is a purely horticultural consideration and not an artistic one, but it is very important. The container you select may look fabulous with the tree, but if it fails to provide sufficient room for the healthy growth of the trees roots, it will very shortly not matter what it looks like. Make sure the pot you pick out is big enough.
There are a number of bonsai guidelines dealing with the sizes, shapes and glazes on containers when used in combinations with the various varieties and styles. As you study the art you will become more familiar with which containers work best for a particular tree. The juniper in this example will be potted into an unglazed rectangular pot of Chinese manufacture.
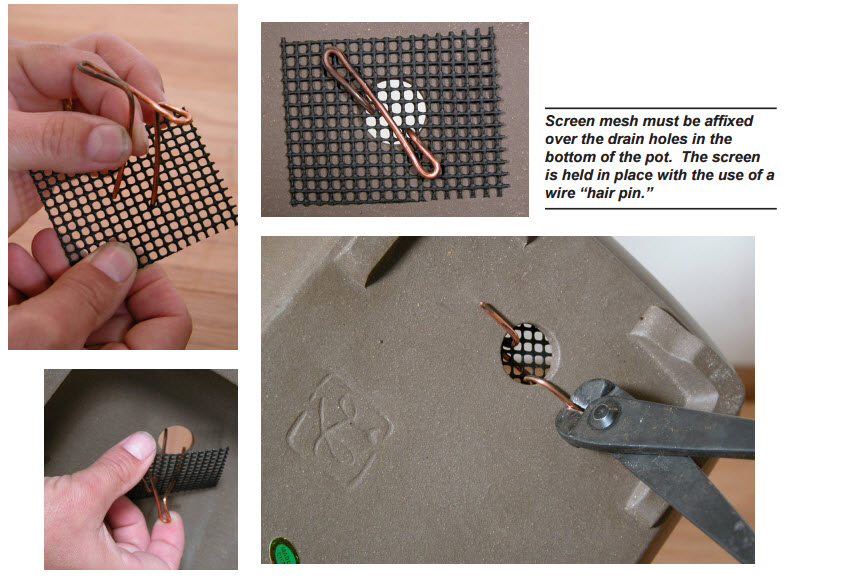
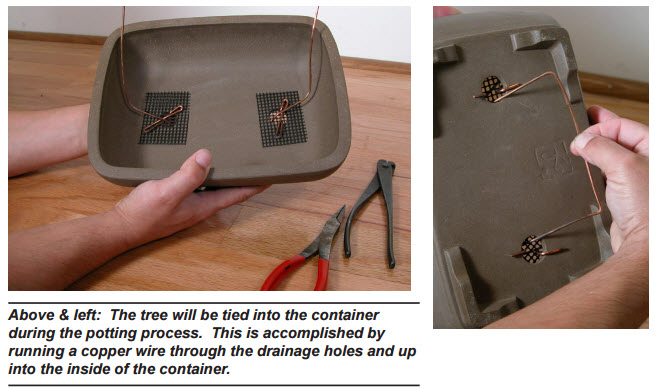
All bonsai pots have holes cut in the bottom. These holes are usually about the diameter of a quarter and allow excess moisture to escape from the pot. Plastic screen is used to cover the holes and contain the soil. This screen is held in place by a wire “hairpin” which is passed through the screen and the pushed through the bottom of the hole. The protruding wire is then bent up on the bottom and prevents the screen from moving off of the hole during the potting process.
Once this has been done a longer length of wire is cut and bent at two right angles. This is then passed through the drainage holes from the bottom of the pot and as close to the inside edges of each hole as possible. This “tie down” wire will be used during the potting process to secure the tree in it’s container.
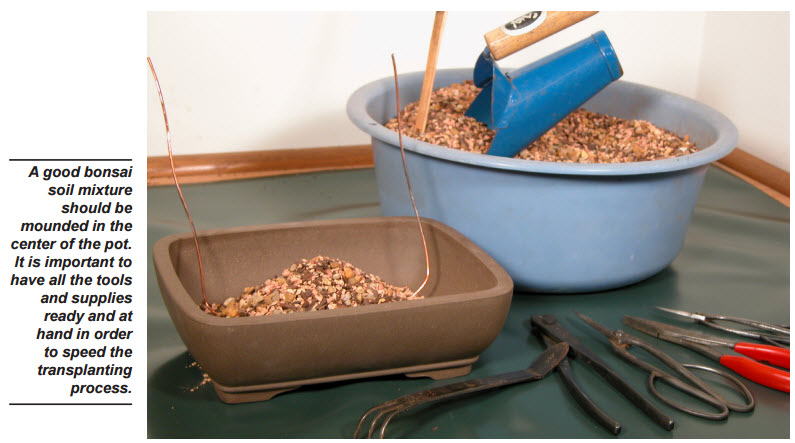
The process, thus far, is known as “prepping the pot” and must be done before any work on the plants root system is started. Likewise all necessary soils and components needed in the transplanting process should be ready and immediately available.
The reason for all this advanced preparation is simple. The root system of any tree is it’s most delicate part. Great care must be taken to insure minimal damage to it. Unnecessary or prolonged exposure to the air can cause irreparable damage to delicate feeder roots. Therefore, the objective is to complete the root pruning and transplant process in a thorough, but efficient manner and minimize the amount of time roots are exposed to the air. Having everything ready and in place will help accomplish this goal. If roots should start drying out, keep a hand mister available and spritz roots with room temperature water as needed.
Step Five: Transplanting & Root Pruning
Carefully remove the juniper from its growing container and take a moment to examine the root mass of the plant. Learning how the plant grows and responds to different kinds of outside stimulus is one of the keys to your success in bonsai.
Unlike the upper portions of the bonsai, the roots aren’t pretty, but keeping them happy and in good conditions is critical to keeping the rest of the bonsai healthy and happy.
Most container grown plants produced for the industry are planted into a mixture of bark chips and sand generally called “growers mix.” This juniper is no exception.
Look for tiny white root tips growing at the bottom and on the sides of the root ball. These white root tips indicate a healthy, happy root system that is actively growing.
Next, try smelling the root mass. If healthy, it will have the wonderful odor of fresh turned garden earth after a spring rain. If the root mass has been too wet, it may smell a little like rotten vegetation and you will encounter slimy or decaying roots in the mass. Bad roots should be cut out.
The amount of roots which may be removed during the initial transplant process will vary greatly based on the variety of plant material being used and the time of year in which the transplant takes place. The general bonsai guideline regarding root pruning states that: For temperate plant material, transplanted in the springtime, just as the plant is pushing out new buds, it is always safe to remove a third of the root system.
It is a good rule, but you will quickly learn certain species will put up with even more drastic pruning if done at the right season. This juniper is a good example. The transplant was made in the springtime, just as the buds were emerging. Junipers are vigorous growers and so there was not hesitation in removing slightly more than 2/3 of the root system. If we had chosen the hotter months for the transplant we might have only taken half of the root system or less. You want to make sure that you don’t remove so much root that the tree will have problems supplying water to the foliage.
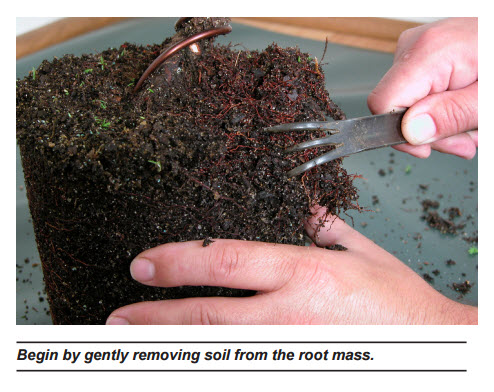
Using a chopstick, root rake or your hands, begin to gently remove soil from the roots. You will notice that a great number of roots will be located near the edges of the pot and at the bottom, and that the interior of the root mass will contain fewer roots. Water drains towards the bottom of the pot. The roots simply go where the water supply is best.
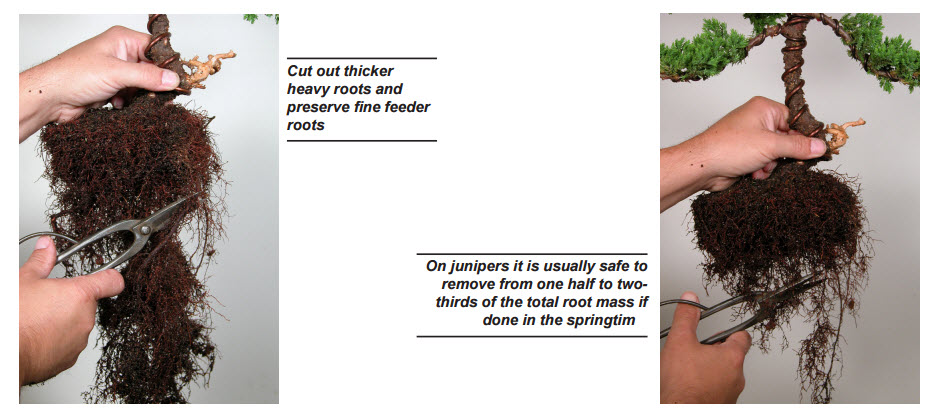 Remove most, but not all of the soil. Leave some soil in the root mass near the base of the tree. Using a pair of sharp shears, remove about 2/3 to one half of the juniper’s root mass. Examine the roots. You will find two types: 1.) Large heavy roots used to anchor the tree in the earth, and 2.) Fine feeder roots used to take up water and nourishment. Feeder roots are our main concern. You will be tying the tree into the pot with wire and will not have need for the heavy anchor roots. Remove them. Remember to move swiftly through this process. If fine feeder roots begin to dry out to spray them with a little water.
Soil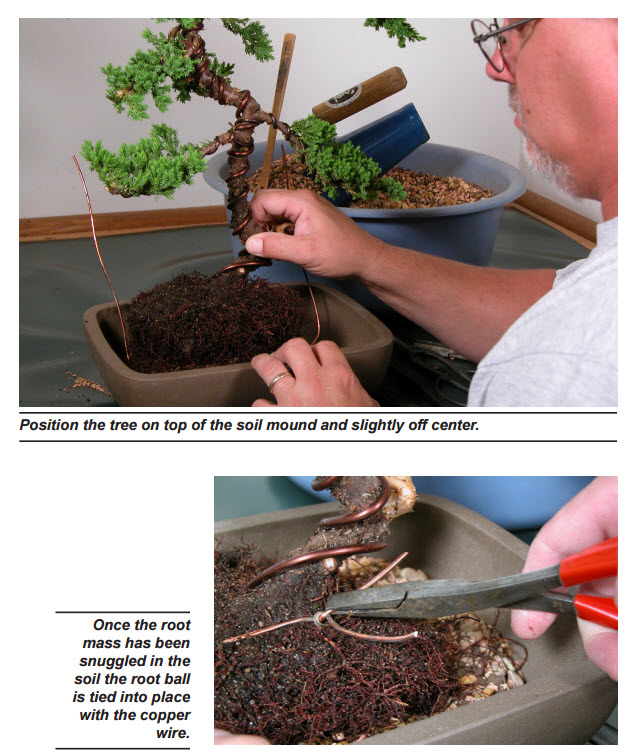
The soil into which you will plant your juniper should be of a type generally used for bonsai. To the newcomer, most bonsai potting mixes resemble a composite of rock and gravel with very little organic material. Such a loose composition is critical to the development of fine feeder roots necessary to insure the plant’s survival in the limited space of a bonsai container. You may obtain ready made bonsai soil from dealers or you may choose to do a little research and prepare a mix of your own choosing. In no case should you repot it using the growers mix or with the heavy black soils sold by most nursery outlets. The correct mix should be very granular and well draining with particle size ranging from one quarter to one eighth inch in diameter.
Place several scoops of bonsai soil into the container, mounding it in a pile near the center. Next take your freshly root pruned juniper, comb out the roots a little, shake off any loose soil chunks that are clinging to it and place it on top of the soil mound in the pot.
It is best, for artistic reasons, to plant the tree slightly off of center. Rotate the soil mass left and right and press downward. As you do this, it will force soil up and into the under side of the root mass. The base of the tree should be just slightly above the top rim of the container. Make sure the tree is positioned at the correct angle and does not look off balance in the container.
Next, bring the two ends of the tie down wire across the top of the root mass. Using a pair of pliers, take out any slack in the wire and twist the ends of the wire together securing the root mass in place. Make sure during this process you do not pull the drainage screen off of the holes in the bottom. Clip the ends of the wire off and bend the sharp points into the soil mass. This wire is only necessary to keep the tree from tipping over for the first few months. Once the roots have had the opportunity to establish themselves you may clip the wire at the surface and pull it out through the drainage holes.
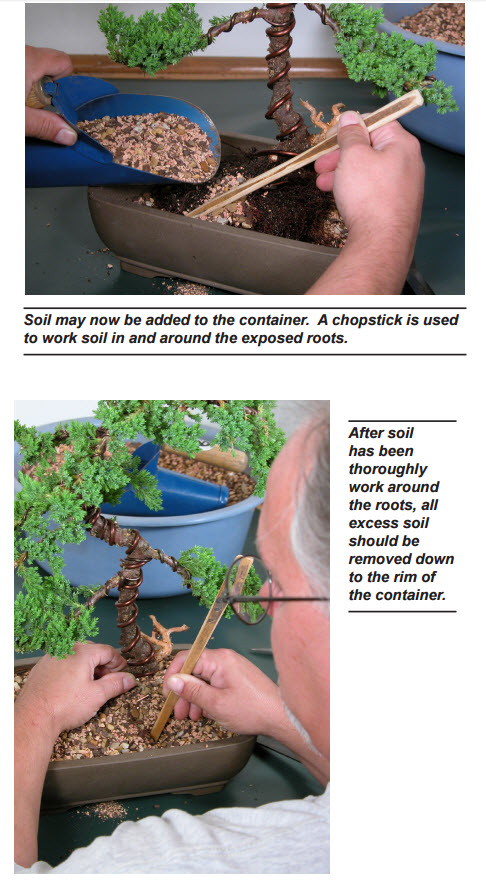
Next, comb out the roots a little more and begin adding bonsai soil to the container. The objective here is NOT to make a root sandwich, i.e. – a layer of soil, a layer of root and another layer of soil. Rather, you should use a chopstick or wooden dowel sharpened to a point and work the soil in and around the roots. The soil mix should be bone dry in order to facilitate this process efficiently.
Chopsticking soil around roots can be tedious and time consuming, but it is critical to the future health of the plant. There is no room for air holes in a bonsai pot… only roots and soil. Take care to fill all the vacant cavities with bonsai soil. As you wiggle the chopstick back and forth, press down with your finger tips to feel the surface of the soil. You will discover you can feel those areas in the container that need more soil.
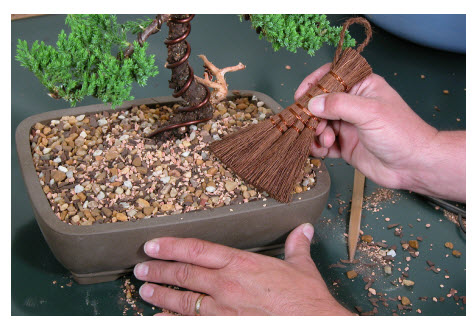
Once you feel that all air pockets have been eliminated and that soil has been properly worked in between all the roots, you may use a brush to sweep remaining soil down to the edge of the pot.
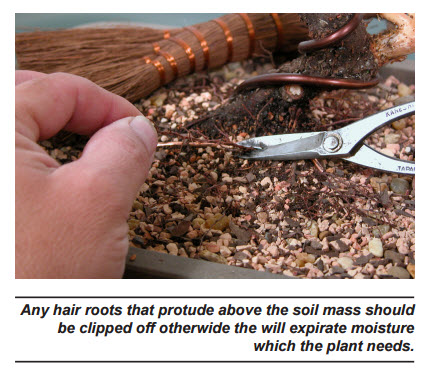
At this point any fine roots which are sticking up out of the pot should be trimmed off with a pair of sharp shears. If not, these roots will expirate water and desiccate the plant.

Step Six: Aftercare
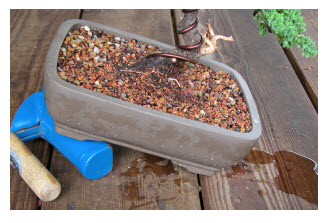
Once the transplanting is complete it is important to get the root mass wet as quickly as possible. This is most effectively done by filling a basin or tub with water and set – ting the tree in the tub up to its rim.
Water will come up through the drainage holes and saturate the entire root mass. Allow the tree to sit in the tub for about 15 minutes and then remove it. You may add rooting stimulants, such as Vitamin B-1, Superthrive or Dyna-gro KLN, to the soak tub, if you wish. Such chemicals sometimes help the root system to overcome transplant shock and recover more quickly.
The initial transplanting process is usually the only time it will be necessary to bottom soak the tree. Most of the time, bonsai are simply watered from the top with a hose or a watering can. Should the tree accidentally dry out you may bottom water again if you wish. It is an effective way to insure that the total root mass is saturated.
Remove the tree from the water and allow it to drain completely. Tipping one end of the container higher than the other will cause it to drain more quickly and completely. This is a good trick to remember because it can also be used on established bonsai to prevent excess moisture build up in a pot during times when seasonal rains are too heavy.
Your bonsai is now… for all intents and purposes… finished. Bonsai are never really finished, but the basic styling structure is now in place and given time to grow, your bonsai will begin to mature and fill out.
You may make minor styling adjustments to the tree at this time or you may choose to add a little moss or top dressing. Moss gives most bonsai a finished look and can be used to accentuate and define the surface roots. Be careful however, covering the surface of your pot with moss can prevent you from observing the moisture content of the soil. Also take care to allow nothing to grow in the pot which would develop a root system that competes with the tree’s roots. There is precious little growing space in a bonsai pot and your tree needs it all.
Now is the time for a little intensive care. For the next three weeks, this freshly transplanted juniper should be kept in the shade. Since a large portion of the root system has been cut away, it is necessary to allow the tree some recovery time so that it can begin to grow new replacement roots. The process of cutting a plants roots actually stimulates it to grow more roots… but this does not happen overnight.
In the interim, mist the foliage as often as possible. A plant will absorb as much moisture through its leaves and bark as it will through its root system. Freshly pruned roots will be hard pressed to supply foliage with moisture. Misting the transplant and keeping it out of the drying sun and wind will help greatly.
After about 3 weeks you may begin giving the juniper about half a day of sun and at the end of a month it should be moved into full sunshine. You may also now begin to feed the tree with a dilute fertilizer solution. For developing bonsai a fertilizer high is nitrogen is best.
Remember the objective is to insure the soil mass stays pleasantly moist, but not constantly soggy. Also try to water in such a way that roots are not constantly jumping back and forth between dead dry and sopping wet. An even, moderately moist soil mass is your goal.
How quickly your tree will dry out will depend upon the conditions in your back yard. Common sense is your best friend. Use the end of your finger. Dig down into the soil a little. If it feels dry… water. If it does not… then don’t water.
There is no ancient oriental secrets concerning the watering procedures for a bonsai. Most people who kill their first tree do so with kindness. They are so worried the tree will dry out that they over water and drown the poor plant. Junipers actually prefer growing conditions slightly on the dry side. Remember… we said they were forgiving. That does not mean you can go away for a week and not worry about watering your bonsai.
Place your bonsai on a regular feeding and watering schedule and pinch new growth to encourage development in the desired areas. Time is now the element which will benefit your bonsai the most. With its passage the tree will become more and more beautiful. Keep an eye on the wire and if it begins to cut into the bark, remove it immediately… even if the branch springs back to its original position. Generally, junipers will set their branches into the desired positions after about 3 or 4 months. The wire can then be removed. Other species of plants make take longer to “harden off” requiring that the wire be left on longer. The juniper can be left in its container for about two years before it will fill the pot with roots and require a transplant. At that time, simply remove it from the container. Comb out the roots, remove about a third and repeat the transplanting process as described above.
By Randy Clark – © 2000 Bonsai Learning Center, All Rights Reserved