
The validity of creating a single bonsai from two separate sources of plant material (one of which has been long dead) has often been a matter of considerable debate within the western bonsai community. Such creations are referred to by the Japanese as “tanuki” bonsai and by many Westerners as “phoenix grafts.”
Regardless of their name, the process in their creation is basically the same. A large and interesting piece of dead wood is used as the centerpiece in the planting. A die grinder or dremel tool is fitted with a router bit and used to inscribe a groove in the deadwood and then a young leggy plant (most often a juniper) is nailed, screwed or otherwise affixed in the groove.
With the passage of time the young plant grows into the groove, the screws are removed and the composite creation, which is then shaped using traditional bonsai techniques, begins to take on the appearance of an ancient tree similar to many of the California and Colorado junipers we see collected from the American desert southwest. 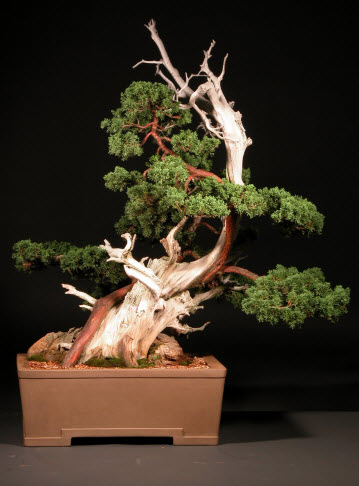
The Japanese Viewpoint
In the hands of a skilled bonsai artist the finished creation can be spectacular, but is it “valid” bonsai? Many Westerners, including this author, say “yes,” but among the Japanese the question is mute. Understanding how such creations got their name may help the reader to understand the Japanese viewpoint on the matter.
The word “tanuki” translates from Japanese as “badger,” an animal which is regarded in the west as particularly vicious and aggressive. However, in Japan badgers are regarded as sneaky tricksters. A popular Japanese folk story tells of a tanuki who dresses up as a Buddhist priest and visits each house in the village tricking the residents into giving him free food and money. In another more x rated version the tanuki visits a “house of ill repute.” One can well imagine what he convinces the residents to provide. With this kind of a history it’s easy to understand how the word “tanuki” has come to mean “something that is not what it appears to be.”
This is not to say the Japanese never make tanuki bonsai… they do. They regard it as a fun and enjoyable diversion, but not to be considered in the same category as regular bonsai. You will not see tanuki displayed in professional shows in Japan because in the last analysis, they do not regard tanuki bonsai as valid. Like the tanuki of fable, such bonsai are not what they appear to be. They are,… in fact,… fake.
A Western Approach
But are they fake? Perhaps it is a question of viewpoint. The term “phoenix graft” was first coined by noted bonsai artist Dan Robinson. His garden in Bremerton, Washington is a spectacular collection of collected and classically designed bonsai, but also includes an impressive collection of tanuki or as Dan would say… phoenix grafts. Like the phoenix bird of classical Greek mythology, rising reborn and more glorious than ever from the ashes of its own funeral pyre, the phoenix bonsai uses long dead ancient wood and young new plant material to create a new artistic vision greater than the sum of its parts.
If, like a painter or sculptor our objective is to create a work of art which evokes an emotional or intellectual reaction from the viewer, then perhaps this type of bonsai is as valid as any other. We must ask ourselves a question. Do we honor our teachers by bringing new insights and new approaches to the art or do we simply pollute and debase it? It is a debate which will continue in the western bonsai community for many years to come.
It is not our purpose here to offer a solution to such a debate, but rather to simply present the mechanics and techniques for creating a tanuki bonsai. Whether you choose to display the finished creation at a bonsai exhibit is a matter for you to decide. Call it what you will, but always remember the words of another great artist. “A rose, by any other name, would smell as sweet.”
Selection of Deadwood
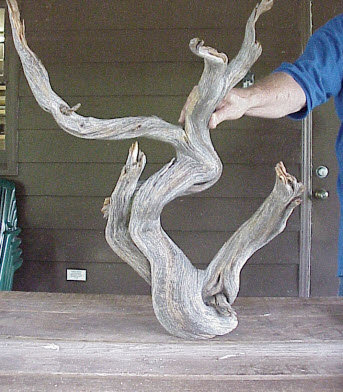
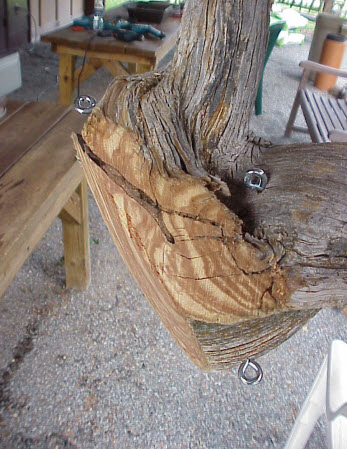
By virtue of the fact that deadwood is being used in its construction, a tanuki bonsai is a temporary creation at best. Whether “temporary” translates at 2, 22 or 202 years will depend largely on the kind of wood you choose for its creation. Water is the enemy. Any deadwood that is in constant contact with moisture is eventually going to rot and require repair or replacement. Therefore, not all deadwood will work, no matter how interesting its shape. It needs to be dense and very hard. The piece used in this article is a juniper snag collected from the western desert, very old and hard enough to pound nails with.
The upper portions of the deadwood which do not come into contact with the soil mass will weather fine, but those portions which extend into the soil mass are in contact with moisture will rot quickly if they are not dense enough. Some people like to paint the deadwood with a wood preservative to ward off the effects of moisture. This can be a good idea. There are many varieties available in the marketplace. However, you should take care that the chemical will not leach into the soil and damage the live tree planted next to it.
Container Selection
Tanuki bonsai are not instant bonsai. You will be working with relatively young plant material which needs time to grow. Assume that you are a good three to five years away from being able to display the tree in an exhibition. Initially, you should select an oversized container. Eventually you will transfer the planting to a container suitable for showing. For now, something as simple as a large plastic bus pan or a wooden growing box will serve you well. Lots of room for root growth will also translate as lots of top growth. We selected an oversized mica training pot.
Plant Selection
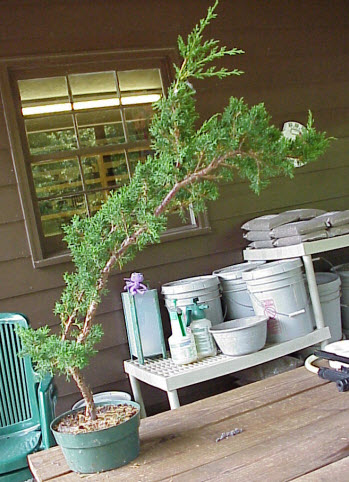
Junipers are most often the plant material of choice for making a tanuki bonsai. This stems from the fact that most ancient trees with this much dead wood usually fall into the evergreen class. More often than not, they are junipers, but pines, yews, firs, and hemlocks might also be fair game. Remember the objective is to create something which looks like it could have been dug out of the landscape… not created for Disneyworld
Be guided more by the mechanical considerations. Fairly young, spindly plant material is required with a trunk diameter not much larger than your index finger. The material selected should be very flexible and willing to put up with having holes drilled through its trunk and getting banged a scuffed about during the creative process. Junipers and pines are very flexible and put up with this kind of treatment. If you select azalea you will discover that the trunk and branches snap easily and that its delicate bark cannot withstand the bruising it will receive. At least for your first attempt, try to keep your problems to a minimum. In this instance we have selected a Shimpaku juniper.
Assembly Protocol
What follows is a step by step guide to creating a tanuki bonsai. Complete these steps exactly in the order listed. Artistic considerations are not the focus of this article, only the mechanical steps necessary to complete the planting. The traditional practices of asymmetrical balance and proper triangulation of the finished planting are the same as they would be for any bonsai. How you position the deadwood, where you cut the router groove and how you position the trunk and branches should be based on solid principles of bonsai design.
Step One
Prepare the container by drilling four evenly spaced holes in the mica pot. These holes should be large enough to accommodate two copper wires through each hole of about 2.5 mm thickness. Place screen over the drainage holes and secure as you would with any bonsai.

Step Two
Determine the angle at which the deadwood will be position in the container.
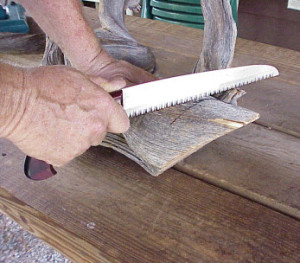
The base of the deadwood must be as flat and parallel with the bottom of the pot as possible. To achieve this you should use a black marking pen and draw a line on the deadwood parallel with the bottom of the pot as close to the trunk base as is possible.
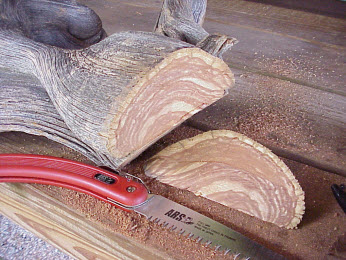
Then using a hand saw, cut the wood so that the bottom is flat and parallel.
Step Three
Use a drill to bore pilot holes for four small eyelet screws. The eyelets should be sunk into hard, solid wood and positioned in proximity to the holes previously drilled in the mica container. The eyelets need to be near the base of the tree and will eventually be threaded with copper wire to hold the snag firmly in place. They will not show when covered with soil.
Step Four
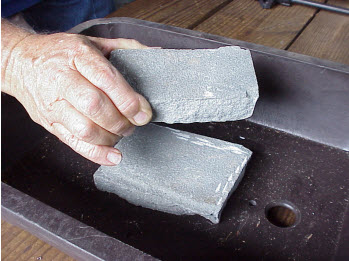
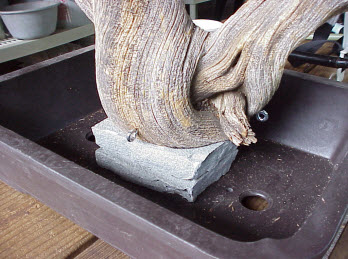
Stone should now be placed into the bottom of the container to elevate the amount of deadwood buried under the soil, thereby decreasing the amount of deadwood exposed to moisture and slowing down the inevitable decay. Broken paving stones or slate can be used and stacked to achieve the desired height. Cut the stones to a size which just accommodates the snag and place in the bottom of the container.
Step Five
Select your plant material (In this case a 3 foot tall Shimpaku juniper with a trunk diameter at the base of about 3/4 inch.) and determine which way the trunk should be positioned onto the snag. This may take some time and planning on your part. Don’t rush!
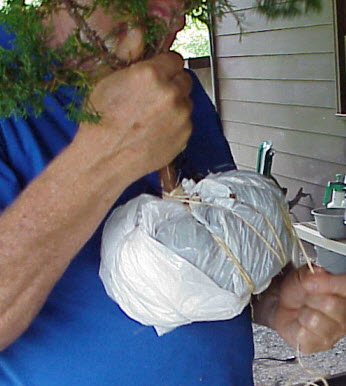
Once you have decided, remove all foliage which will be located between the trunk of the deadwood and the trunk of the live juniper. Use a marking pencil to draw a line on the deadwood indicating where the groove you wish to cut will go. Next, remove the juniper from its container, wrap it in a plastic bag and tie very tightly with string. This step is very important. The roots must remain unharmed and not dry out during the lengthy process which follows.
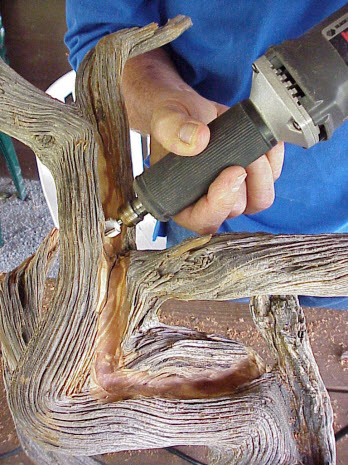
Step Six
Using a die grinder or dremel tool fitted with a round nose router bit (ours was about half an inch wide,) cut a groove into the deadwood. One artistic note… You will be tempted to place the entry point of the live wood onto the snag at the back of your planting. Be advised that from the front view of the tree, it is considered “good bonsai” to insure that a portion of live trunk (also called the “life line”) is visible as it emerges from the soil.
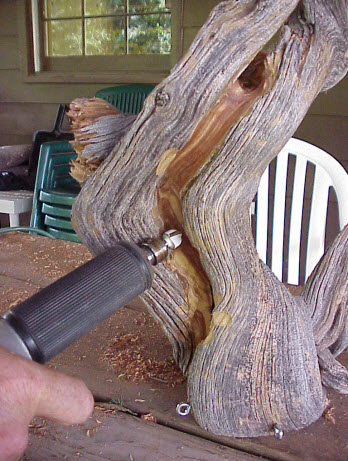
The groove needs to be at least half again the depth (or more) of the shimpaku’s trunk diameter and at least half again as wide. Remember you are working for a showable tree in 3 to 5 years. If you make the groove too shallow, the tree will eventually push itself out of the groove. A word of caution. Router bits are very sharp and don’t particularly care if they cut flesh or wood. Die grinders and dremels are dangerous power tools and if you have never used one before you should proceed carefully and seek the assistance of someone who has.
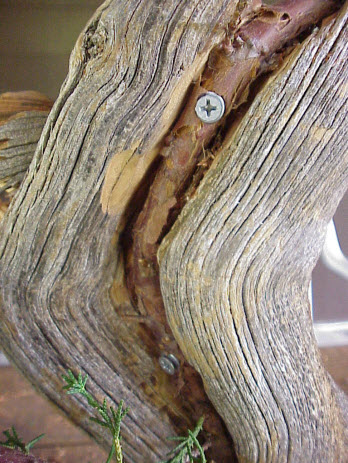
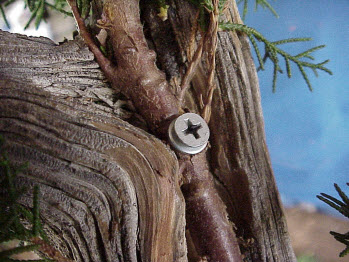
Step Seven
Starting at the base, begin to fit the juniper into the groove in the deadwood. Use a small drill bit to bore a hole through the live shimpaku and slightly into the snag. Then use an appropriately long sheet rock or deck screw fitted with a small washer and secure the juniper snugly into its groove in the deadwood. (The washer prevents the beveled head of the screw from sinking into the trunk of the juniper too far. Move up a few inches and place the next screw. You will discover that this process works better with four hands than with two. Ask a friend to help. Try to use as few screws to do the job as possible. Work slowly and from the bottom of the tree up. It may be necessary during this process to deepen or round off the groove to allow for passage of the tree trunk or to cut a vent to allow a side branch to escape from the channel.
NOTE: Make sure you secure the base of the tree (which contains the root mass) slightly to the left, right, front or back of the deadwood snag and not directly below it. Remember that the snag is supposed to sit on top of the stones in the container. It will not be able to do this if you have roots located directly below the snag bottom.
Step Eight
Run a double set of copper wire through the holes you drilled in the container earlier. Use copper not aluminum which has a tendency to stretch and break in these situations. Place a layer of bonsai soil in the bottom of the container and position the cut stone in the correct spot over the center hole and on top of a small layer of soil.
Remove the plastic from around the shimpaku’s root mass and position the tanuki on top of the rocks and into the container. It is important that you be as gentle with the root system as possible and remove only enough soil and root to allow you to position the planting and cover the roots.
Step Nine
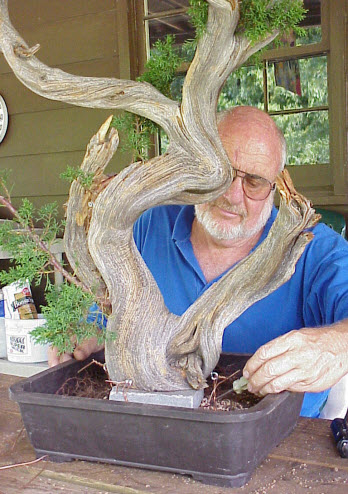
Tie the tanuki in place by threading two strands through each eyelet and twisting to secure. Use a screwdriver to twist tighten the wire if necessary.

The snag and shimpaku MUST be immobilized. Place bonsai soil into the container and chopstick to eliminate air pockets in the customary fashion.
Afterwards soak the planting in water and protect from sun and drying winds for about two weeks. Then return the planting to full sun. Begin feeding after 3 to 4 weeks. Feed heavily for the next two years. You want to promote as much growth as possible. Do not repot the tree for at least two years.
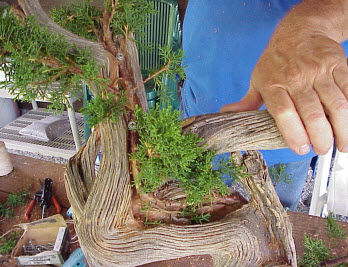
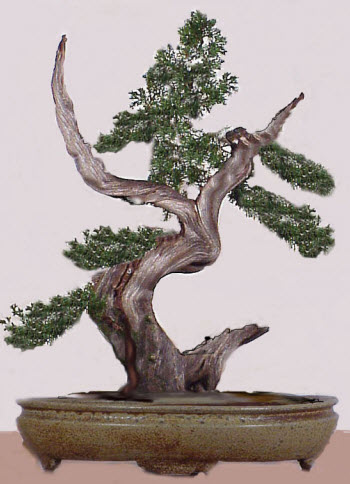
Step Ten – The Future
The completed tanuki is now ready to begin developing as a bonsai. There is a lot more to be done, but not for awhile. What the tree needs now is time to develop. Once you know the tree is thriving and healthy, you may begin wiring and shaping branches and carving and treating the areas of deadwood.

After about a year the tree will have hardened into the shape it was bent and the sheet rock screws may be removed without fear that the tree will spring back. As the tree develops more roots and increases its grip on the deadwood you will discover the need for the massive amounts of tie-down wires described in step nine will become less necessary.
NOTE: This article and images it contains were written and photographed by Randy Clark, resident bonsai artist at the Bonsai Learning Center, NC. They are intended for private use only. Reproduction of this material for commercial purposes is strictly prohibited without the written consent of the author.