
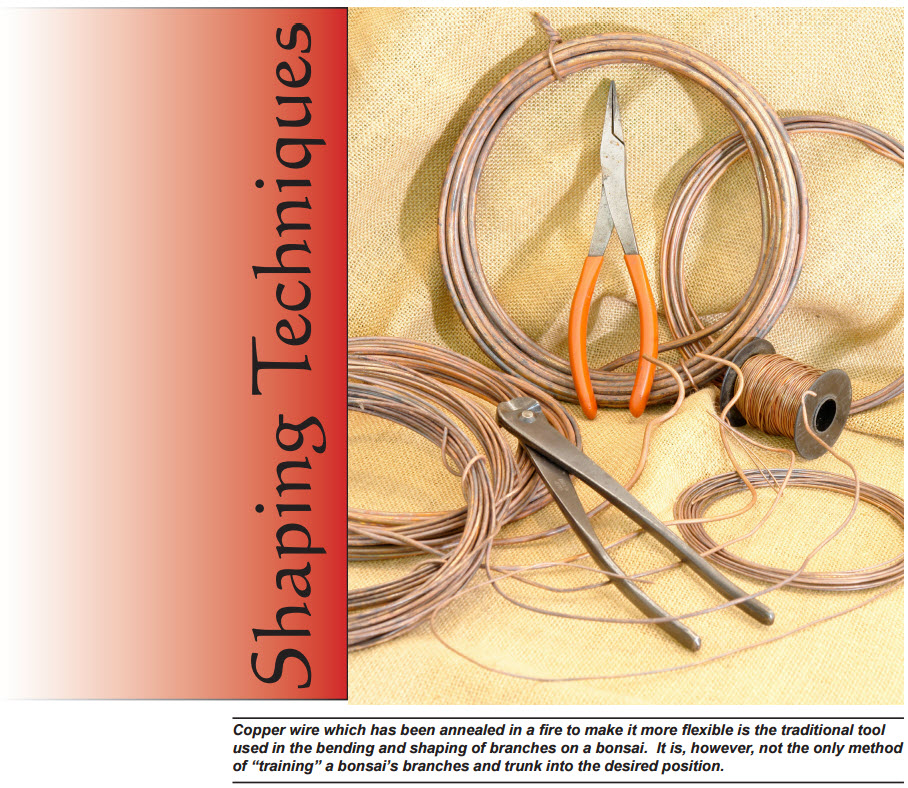
Wire & Its Use In Bonsai
Wire is placed on the trunk and branches of bonsai for one purpose… to assist in making branches and trunks bend to the desired location. Like a hammer or a screwdriver, wire is a tool designed to accomplish a specific task in the most efficient manner possible. When it has served its purpose, it is removed.
Interestingly, a segment of the population seems determined to believe that wiring a bonsai is the key to some sort of ancient Asian secret for keeping the tree small. People have ask if the purpose of the wire was to cause the tree great pain. They were sure that the creation of bonsai had something to do with the ancient Chinese practice of binding the feet of noble women. When I would smile and patiently explain what the wire was actually used for they seemed…. somehow…. disappointed.
Wire serves the same purpose as braces on a child’s teeth. It is a temporary shaping device designed to be removed after it has done its job.
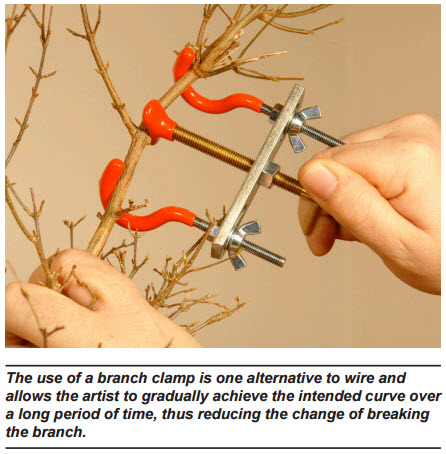
The objective is to bend trunks and branches. In most situations wire is the simplest and quickest way to get that job done. However, it is certainly not the only way to bend a branch. Other methods include: tying branches to the edge of the container with string; hanging weights from the branches or using trunk jacks and branch clamps. It should be remembered that the objective is to move the branch. How that task is accomplished is of secondary consequence.
In fact, the use of wire in bonsai is not even mandatory. One school of bonsai in China known as the Ling Nan School, prohibits its practitioners from using wire. Ling Nan proponents insist that the use of wire gives the tree too much of a finished/refined appearance and that a more natural and pleasing effect can be achieved by simply clipping and growing branches.
While this artistic viewpoint has some merit, most of us will, at one point or another, wish to alter our bonsai’s appearance by bending a branch using wire.
On the surface, the process sounds deceptively simple. 1. Put wire on tree. 2. Bend branch to desired position. 3. Wait for branch to harden in that position. 4. Remove wire from tree. Nothing is as simple as it first appears.
For beginners, wiring can be a frustrating experience, but with practice and time comes control and precision. Eventually beginners discover a fact that experienced bonsaists already know. Wiring is one of the most relaxing and enjoyable processes in the creation of a bonsai.
Understand The Task
Understanding the growth habits of the particular variety of plant material being shaped is one of the keys to success. Once a branch has been wired and moved to the desired position a certain amount of time is required for the branch to “harden off” before the wire can be removed. How much time will vary and is based on the kind of plant material being shaped; the thickness of the branch and the extremity of the bend involved.
Pines, for instance, are soft wood trees which are full of sap. They grow slowly and often take a long time before they can put on enough new wood to hold their position. Junipers on the other hand grow vigorously and will adapt to their new shape quickly. Some trees will take a month, some a year. Unfortunately, the only way to know for sure is to remove the wire and see if the branch remains where it was placed. If it does not, it must be rewired.
It is worth noting that some species of plants are such vigorous growers they will defy any attempt at shaping with wire. Weeping willows and Alberta spruces are two excellent examples and can be depended upon to move branches back into their original positions within days, if not hours after having their wire removed.
A Word Of Caution
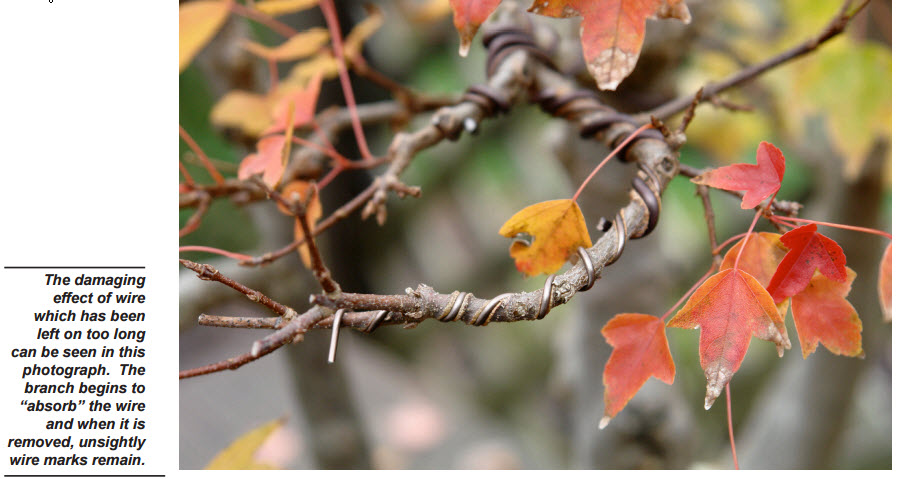
Because one can never be absolutely sure how long to leave wire in place, bonsaist will often leave wire on the tree for as long as possible. This can be very dangerous. It is possible to destroy a good piece of bonsai material by doing so.
If left on for too long, the branch will begin to grow into and around the wire. As it does it will leave spiral shaped marks on the bark. Horticulturally speaking, the tree could care less about wire marks. In most cases it will eventually absorb the wire and keep on growing.
However, from an artistic standpoint wire marks are a disaster. The objective in bonsai is to replicate nature’s patterns. Nature does not leave wire marks on her trees. Neither should you. Wire marks are a sign of bad artistic technique because they indicate that the artist was not doing his/her job. When such trees are entered into a competition judges will certainly deduct points for wire scarred trees.
Obviously it is good idea to watch a freshly wired tree closely. If the wire starts becoming too tight, remove it immediately, even if it means the branch will not hold its shape. The wire can always be reapplied later in a different position.
Trees can generally be wired and shaped at any time during the year. Extensive wiring in the early springtime, however, should be avoided. Most plants get a vigorous spurt of growth during this period and will develop wire marks quickly.
Also remember the majority of trees send their most vigorous and active growth to the top of the plant. The horticultural term for this habit is “apical dominance”. It means that branches in the upper regions of the plant are enlarging faster and will therefore be more inclined to develop wire marks more quickly than lower branches.
What Kind Of Wire To Use
Generally speaking any type of wire can be used to shape a bonsai. The objective is to bend the branch and any means used to achieve that end is permissible. Practically however copper and aluminum wire have become the standards.
Both types offer sufficient holding power when used in the correct gauges and both are pliable and easy to apply to the tree. Copper wire develops a dark patina and aluminum wire for use in bonsai comes with a brown anodized coating to make it darker and less shiny. Copper and aluminum each have advantages and disadvantages associated with their use.
Copper Wire
Solid core copper wire has twice the holding power of aluminum and is the traditional substance used for shaping bonsai. For many years it was the only type of wire available and for many bonsai purists it is still the only wire to be used.
Solid core copper is the same type of wire used to route electrical power throughout a home. Obviously, the plastic coating is removed. A variety of gauges (thicknesses) will be needed varying from the diameter of a string to the diameter of a pencil. Thicker wire will be needed to bend thicker branches, medium wire for medium branches, and so on. Thinner gauges of wire work fine right off the shelf, however, thicker gauges of copper wire are so stiff and difficult to bend that they will need to be annealed in a fire before they can be used.
Annealing Copper Wire
Traditional Japanese textbooks instruct beginners to anneal their wire in a rice paper fire. Here in the west, we’re a little short on rice paper. Actually any good heat source will work. A barbecue pit, an oven or a plain old wood campfire will work fine. The business of heating the wire causes molecular changes to occur which make the wire softer and easier to bend.
What happens from a physics standpoint is that the normal positive/negative alignment of the molecules in the wire become scrambled by the heating process. This causes the wire to become softer and more pliable. The flexing process, which occurs the first time the wire is bent, causes the molecular alignment to return and the wire instantly regains its former rigidity. This means that annealing the wire will make it easier for you to wrap around the branch, but as you do so, it regains its original hardness and strength for holding the branch in place. This is a positive advantage.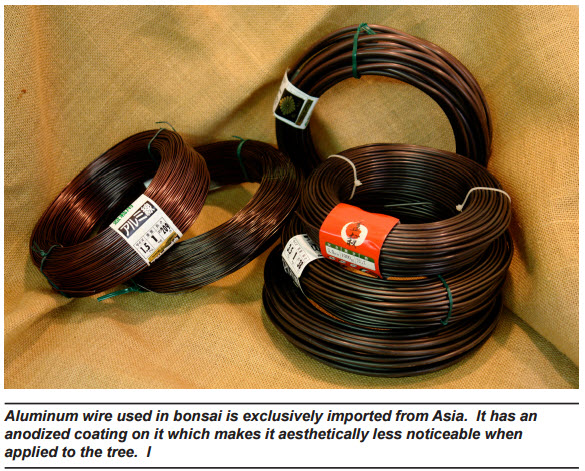
A word of caution to those attempting the annealing process for the first time. The wire must be heated ONLY until it glows red and then immediately removed from the fire and allowed to cool slowly. If the wire is overheated it will crystallize and will crumble like uncooked spaghetti the first time it is flexed. Ruining wire in this way can be annoying. In fact, it was one of the reasons we began looking into the use of aluminum wire.
Aluminum Wire
The aluminum wire used for bonsai has an anodized coating on it to make it aesthetically harmonize with the bark of the tree. Anodized wire is not required for bonsai, only preferred. This earth tone blends better with the bark and makes an extensively wired tree seems less unsightly. Anodized aluminum is entirely imported from Asia and is available only through Bonsai suppliers.
Aluminum is a considerably softer metal than copper. Because of this aluminum has become the preferred wire among Japanese azaleas growers. Azaleas have thin bark which damages easily. Softer aluminum is less inclined to injure these more delicate trees. Copper wire can also be used on trees with tender bark, but is usually wrapped in paper or raffia to provide a soft cushion between tree and wire.
In addition to its softness aluminum wire’s one great advantage is that it does not have to be annealed. The great disadvantage is that it has half the holding power of copper. That means the diameter of any wire used to bend a branch will be twice as thick when aluminum is used as it will with copper. 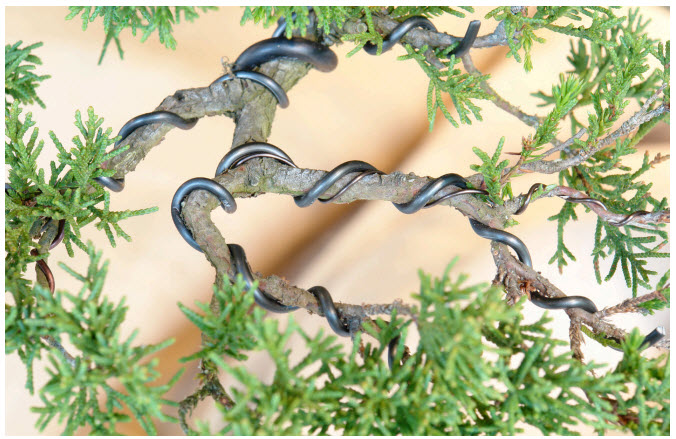
Aluminum has one other advantage which, at the same time, can makes it a little dangerous. When the time comes to remove it, aluminum can be very carefully uncoiled from the branch, straightened and reused on another tree later.
Copper, because it regained its rigidy in the application process is somewhat more difficult and is usually removed in small pieces with a bonsai wire cutter. We all like to save money, but consider that uncoiling any kind of a wire runs the risk of accidentally snapping and breaking branches. Our recommendation is to decrease the chance of breaking branches by cutting off all wire, whether it be copper or aluminum.
How To Apply The Wire
Learning how to correctly place wire on a bonsai is largely a matter of practice… And practice will make perfect. An experienced bonsai artist can bend and shape their creation using a minimum of wire. Beginners trees often look as if they were caught in an explosion at a spaghetti factory. Effective technique comes from practice and experience. This comes with time. Technique and tidiness are important, but the objective is to shape the tree. Extensively wired bonsai are “in training” and are not supposed to be showpieces. That comes later after the wire is removed.
It is important to try and get as organized as possible. Developing a technique with which you are personally comfortable is best. Be neat, organized and try to apply the minimal amount of wire in such a way that it does the maximum amount of work. Some bonsai artists like to completely wire all the branches on their tree first and then bend them to the desired positions. Still others like to wire one branch at a time, bend it into position and then proceed to the next branch. Some like to start at the top of the tree and work down… others at the bottom and work up. It is all personal preference. There are, however, some guidelines that should be observed:
General Guidelines For Placement Of Wire On A Bonsai
1. If you are unsure about whether or not to remove a branch, it is usually better to wire the branch and try to work its placement into the final design than to cut it off. The branch can always be removed after the fact .
2. Always begin with the thickest branches and the heaviest wire first. Gradually work toward thinner branches and thinner wire. This will greatly assist in the task of keeping the wire placement organized and orderly.
3. Avoid crossing wires when possible. Follow previous strands up the trunk and out the next branch. The result will be increased holding power and a much more professional appearance.
4. Wire needs to be applied so that it is snug against the bark with no spaces or gaps, yet not so tight that it cuts into and damages the bark. You should not be able to see daylight between the wire and the bark. Loosely applied wire will increase the risk of cracks or stress fractures in the branch.
5. Wire needs to be coiled at about a 45 degree angle perpendicular to the branch or trunk and placed snugly up against it. An angle of about 45 degrees seems to provide the best holding power. Wire coiled too close together will tend to behave like the spring on a screen door and will want to “spring” back. Wire coiled at an angle greater than 45 degree may leave such wide unsupported sections of the branch exposed that breaks and cracks may more easily occur. This is a critical consideration on heavier branches, but becomes less critical with smaller branches.
6. When wiring any given branch you have the choice of applying the wire in a clockwise or counterclockwise direction. Plan what you are doing. Don’t simply “throw” wire onto the tree. If your plan is to move a branch down and to the right then placing wire on the branch in a clockwise pattern will cause it to tighten slightly during the bending process. Counterclockwise placement would cause it to loosen slightly and therefore lose holding power. Think about what direction you are wiring and how you plan to bend the branch. Again, this is a consideration which is more critical for thicker branches than for thin ones.
7. Any given piece of wire applied to a tree needs to be secured to some other part of the tree if it is expected to hold when bending pressure is applied. A piece of wire has two ends. Always attempt to wire two branches (of the same diameter) with one piece of wire. When doing this make sure that the wire makes at least one circumference of the trunk (more if necessary) before going out the next branch. This “required” turn around the trunk will insure that when branch #1 is moved, it will not cause branch #2 to also move. Instead, the “torque” will be against the trunk and not the other branch being wired. If you have only one branch to wire, secure the opposite end with a couple of wraps around an adjacent branch.
8. When applying wire always support the branch being wired with the thumb and forefinger of your opposite hand. Bring the wire to the tree and rotate the wire slightly as you wrap it about the branch. This rotation will cause it to seat more snugly against the branch. When working with very thick wire you will find a pair of wire pliers handy for assisting with this task. When that wrap is complete, inch forward with your thumb and forefinger and support the next section as you apply the next wrap. Continue in this manner until you have reached the end of the branch. This technique guarantees that the branch will always have the solid support of the artist’s hand as the wire is moved into place and that unnecessary breaks will be avoided.
9. Place wire on the outside of any intended curves or bends you plan to make. When bending a branch the wood of the tree is compressed on the inside of the curve and stretched on the outside of the curve. Placement of wire along the outside of the curve provides critical support where it is most needed.
10. To determine the correct gauge of wire needed to hold a branch securely in place you can try pushing on the branch with an extended piece of wire about 8 or 10 inches long. As you “push” against the branch you will discover that: 1. the branch will move, or 2. the wire will bend. If it is the wire that bends, it is probably of insufficient strength to hold once coiled into place. Go to the next thickest diameter and repeat the test. At some point the wire will remain rigid and the branch will move. This is probably indicates you have selected a gauge of wire sufficiently thick enough to hold the branch securely. Note that we said probably.
If the branch does not remain in its new position, you have two options: 1. remove the wire and replace it with a heavier gauge that will hold, or 2. Place another strand of wire on the same branch by coiling it alongside the first one.
The development of good wiring technique is dependent upon practice more than any other thing. Remember that if the branch goes where you bent it and does not break… you did it correctly. Admittedly you will probably use more wire than necessary in the beginning and its organizational structure on the tree will look a little like a road-map in the mountains, but with time and practice your technique will improve.
© 2000 Bonsai Learning Center, All Rights Reserved
