The raft and sinuous styles are characterized by a single trunk that is growing along the ground, with three or more trunks rising from it. In raft style, the trunk along the ground is perfectly straight and illustrates a tree in nature that has been blown over by the wind, taken root and had its branches on the upward side continue growth as new trunks. Sinuous style is very similar, however the trunk going along the ground may be curved and this depicts the case where travelling surface root has meandered along the ground and suckers have developed into new trees. One advantage of this style in bonsai is that trees with one-sided branching may be used, by laying down the side without branches on the ground. (Figure A) 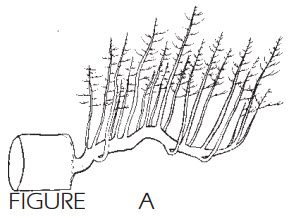
First, is there is a bow in the trunk, it should be placed so that it curves towards the back of the setting. This will add to the three dimensional effect. Another idea that can create more depth in raft or sinuous style is to use branches going out horizontally from the laid down trunk, as well as those growing vertically upward from it. These horizontal branches may be ground layered for a certain distance and then trained upward to form trees. Some branches will be pliable enough to be bent, while others may need to be undercut with a wedge shape wound in order to train them up vertically.
Remove all branches from what will be the underside of the planting and wire normally. Careful attention must be given to the removal of this wire upon the first transplanting it may otherwise become entangled with the newly forming root system and later become very difficult to remove.
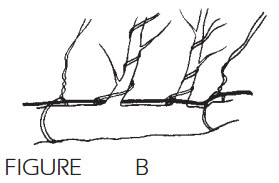
An alternate method of wiring is to place a heavy wire along the top side of the laid down trunk, attach it with string in a few places and then anchor the wires for each branch individually onto it. (Figure B) Another alternative would be to wire each branch individually with double wire looped once around the prostrate trunk. Take care because this too can interfere with root formation.
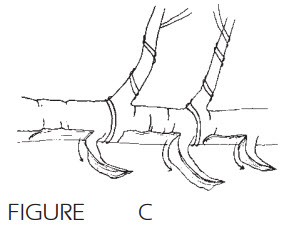
The technique for forming roots on the underside is reasonably easy. The bark is cut in the form of flaps on the underside of the trunk – especially under the positions of strong branches. (Figure C) The actual cuts should be the width of about a third of the circumference of the trunk and be made in the direction from base to tip. A piece of small wood or pebble can be used to hole the flaps open. Rooting hormone can be then dusted into the open cuts. Shallow wedge shaped grooves cut horizontally thru the cambium layer on the underside of the branch will also work well.
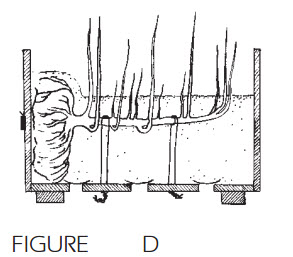
A heavy wire should then be placed between the existing root system and trunk and tightened securely. This will reduce (but not cut off) the flow of nutrients to the existing branches and will encourage the new branches to send out roots around the cut areas in search of additional moisture and nutrients. The planting should be placed in a training box filled with fairly sandy soil and the trunk should be buried, but no so deeply that roots tend to form on the new trunks, rather than the underside of the raft. (Figure D) Remember that roots develop only on a stationary tree, so tie the new planting securely so that it does not move around. At least 50 percent of the plant’s existing root system should be removed at the time of the initial planting. This again encourages the plant to form new roots in the desired locations. If the remaining root ball stick up out of the soil, it may we well to cover it with moss or mulch to prevent drying out. Do not abuse the old root ball too badly… It is the plants only source of nutrient until the new roots have formed.
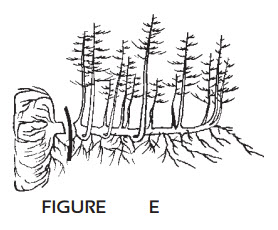
The formation of new roots will take one to two seasons. Fertilize and water normally. Try and avoid the temptation to dig around in the container looking for new roots… you will know soon enough. You may give more attention to the areas where roots are forming and less attention (water and fertilizer) where the old roots exist. After one year, remove the plant from its box and inspect the root system. If sufficient roots have developed, the old root ball may be removed completely. (Figure E) If the new trunks have still not developed sufficient roots, remove another third of the old root system and replant. Continue this process each spring until the desired results are achieved and the planting can be transferred into a shallow container and more detailed styling begun.
(Figure F) Note: During the first transplanting, it may be wise to remove all wire around the trunks to prevent future removal problems.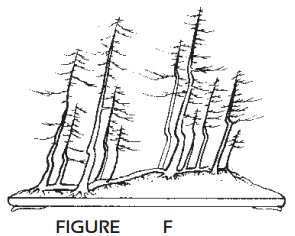
Since some species root more readily than others, it is possible that areas which had been cut and dusted with rootone will have healed over rather than generated new roots. If this has happened, simply repeat the procedure and use less root tone this time.
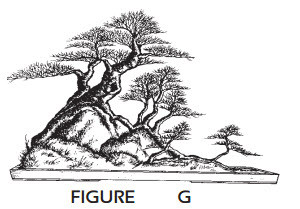
It is better to choose quick-rooting varieties for creations of this style. Junipers are particularly accommodating. However, if you want to develop a slower variety, such as a pine, bottom heat would be advantageous. You may also plan on 2 to 4 years to complete the process. Also note that this style adapts well to being planted over a rock. (Figure G) Also note that with multiple trunk styles, individual trees may be cut apart from the main trunk and trained separately. This proves to be a much quicker and easier method of developing several trees from one plant than the traditional air layering method.
Information and illustrations for this publication were extracted with grateful thanks from Bonsai Techniques by John Naka and Bonsai, Its Art, Science, History and Philosophy by Deborah R. Koreshoff.
Written by Randy Clark
