
Sub-Total: $0.00
Raft Style Bonsai
Ground Layering Techniques Explained
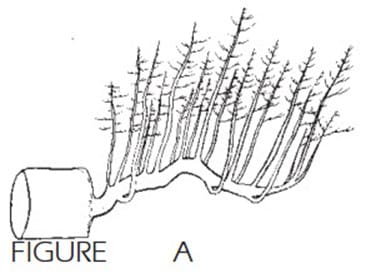
Raft style bonsai is a striking multi-trunk composition created from a single original tree laid horizontally along the soil surface. Over time, new trunks rise upward from that horizontal trunk, creating the illusion of several trees growing together naturally.
Two closely related forms exist within this approach: raft style and sinuous style. Both rely on the same horticultural technique, but they differ in visual interpretation.
Raft Style vs. Sinuous Style
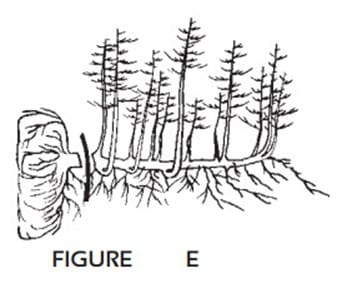
Raft Style represents a tree that has been blown over by wind or snow. The original trunk lies straight along the ground, takes root, and branches on the upward side develop into new vertical trunks. This produces a formal, linear composition with a strong sense of direction.
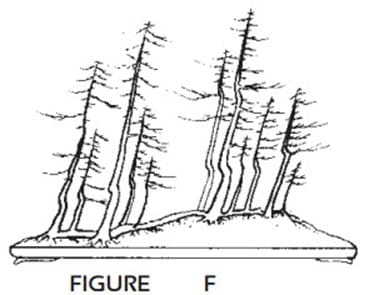
Sinuous Style suggests a surface root or fallen trunk that has wandered across the ground. The horizontal trunk may curve or undulate, and the vertical trunks emerge at irregular intervals. This version feels more organic and spontaneous.
One major advantage of both styles is that trees with one-sided branching can often be used effectively by placing the bare side downward and allowing the branched side to form the new forest canopy.
Selecting and Positioning the Trunk
When laying the trunk down, pay attention to any existing curve or bow. If present, orient the curve toward the back of the planting. This increases visual depth and prevents the composition from appearing flat.
To enhance realism, allow a combination of vertical trunks and horizontal branches. Some horizontal branches can be ground layered for a short distance before being trained upward, creating additional trunks and complexity.
Flexible branches may be bent gently into position. Stiffer branches may require a shallow wedge cut on the underside to allow them to be raised safely without splitting.
Preparing the Trunk and Branches
All branches on the underside of the trunk must be removed completely. The remaining branches should be wired in their future positions before planting.
Special care must be taken with wire placement. During the first transplant, wire can become entangled with developing roots and become extremely difficult to remove later. It is often best to remove all wire at the first repotting once branches have set.
Alternative Wiring Methods
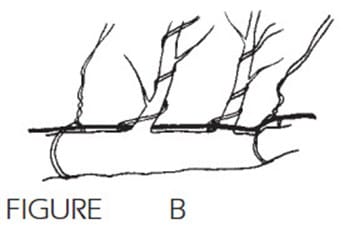
Instead of wiring each branch individually around the trunk, you may:
- Attach a heavy wire along the top of the horizontal trunk and anchor individual branch wires to it using string.
- Use double-wire loops around the trunk for each branch, taking care not to obstruct root formation.
Whichever method is chosen, the goal is stability without interference with new roots.
Creating Roots on the Underside
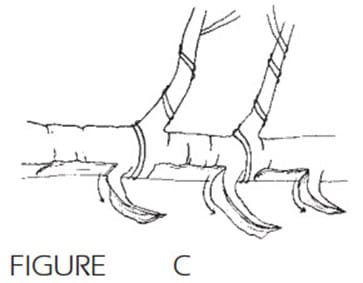
Root formation is achieved through controlled wounding of the trunk underside.
- Cut bark flaps lengthwise along the trunk, especially beneath strong branches.
- Each cut should be approximately one third of the trunk’s circumference.
- Small wedges, toothpicks, or pebbles can be used to keep the flaps slightly open.
- Apply a light dusting of rooting hormone to the exposed cambium.
Alternatively, shallow wedge-shaped grooves cut horizontally through the cambium also encourage root production.
Avoid excessive rooting hormone. Too much can cause wounds to heal over rather than produce roots.
Managing Energy Flow
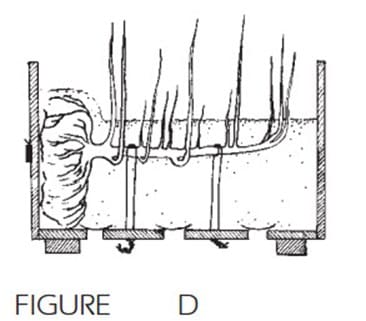
To further encourage root development, place a heavy wire between the original root system and the trunk and tighten it firmly. This restricts, but does not stop, nutrient flow to the old roots, prompting the tree to generate new roots along the horizontal trunk.
At the time of planting, remove approximately fifty percent of the existing root mass. This encourages aggressive root production in the desired locations.
Do not over-reduce the old root ball. Until new roots form, it remains the tree’s only source of nutrients.
Planting and Stability
Plant the raft into a training box filled with a free-draining, sandy soil mix. Bury the horizontal trunk shallowly, deep enough to encourage rooting underneath but not so deep that roots form along the new vertical trunks.
Stability is critical. New roots will only form if the planting does not move. Tie the trunk securely into the container.
If portions of the old root ball remain exposed, cover them with moss or mulch to prevent drying.
Timeline and Ongoing Care
Root formation typically takes one to two growing seasons.
- Water and fertilize normally.
- Maintain consistent moisture without disturbance.
- Avoid digging to check progress. The tree will show its success through improved vigor.
After the first year, lift the planting and inspect root development.
- If sufficient roots have formed, the old root ball may be removed entirely.
- If roots are still weak, remove another third of the old roots and replant.
Repeat this process annually until the planting is fully supported by new roots.
Species Considerations
Fast-rooting species are best suited for raft style.
- Junipers respond exceptionally well and are ideal for beginners.
- Pines and slower species can be used, but expect a longer timeline of two to four years. Bottom heat may significantly improve results.
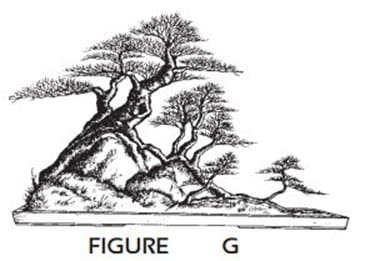
Raft style also adapts beautifully to rock plantings, where the trunk follows stone contours before rooting.
An additional benefit of multi-trunk styles is that once established, individual trunks can be separated and trained as independent bonsai. This method is often faster and more reliable than traditional air layering.
Final Thoughts
Raft style bonsai is a powerful fusion of horticulture and design. It rewards patience, careful planning, and a willingness to think beyond traditional upright forms. When executed well, it captures the drama of survival and regeneration found in nature, transforming a single tree into an entire living landscape.
Illustrations for this publication were extracted with grateful thanks from Bonsai Techniques by John Naka and Bonsai, Its Art, Science, History and Philosophy by Deborah R. Koreshoff.
Check out this article next: